For the past two months we’ve been working on a new user interface to allow our customers to create responsive layouts and content for their websites, dubbed “Pagebuilder”.
Our current method of creating content relies exclusively on the TinyMCE text editor, and we’ve long advised our users to create their layouts with tables within the editor. This method of creating content has resulted in numerous problems for us in the product team, notably how to make table based content reflow in a responsive website. And for our customer account managers, who are frequently asked how to get images and text aligned next to each other in table cells, pixel-perfect.
Pagebuilder has been designed to:
- Provide a simple drag and drop interface to add types of content (i.e. images, text and forms) to a page
- To dynamically adjust the layout of the page based on the content the user has added
- Allow us to nicely reflow the content on our responsive website templates
Stage 1 - Planning
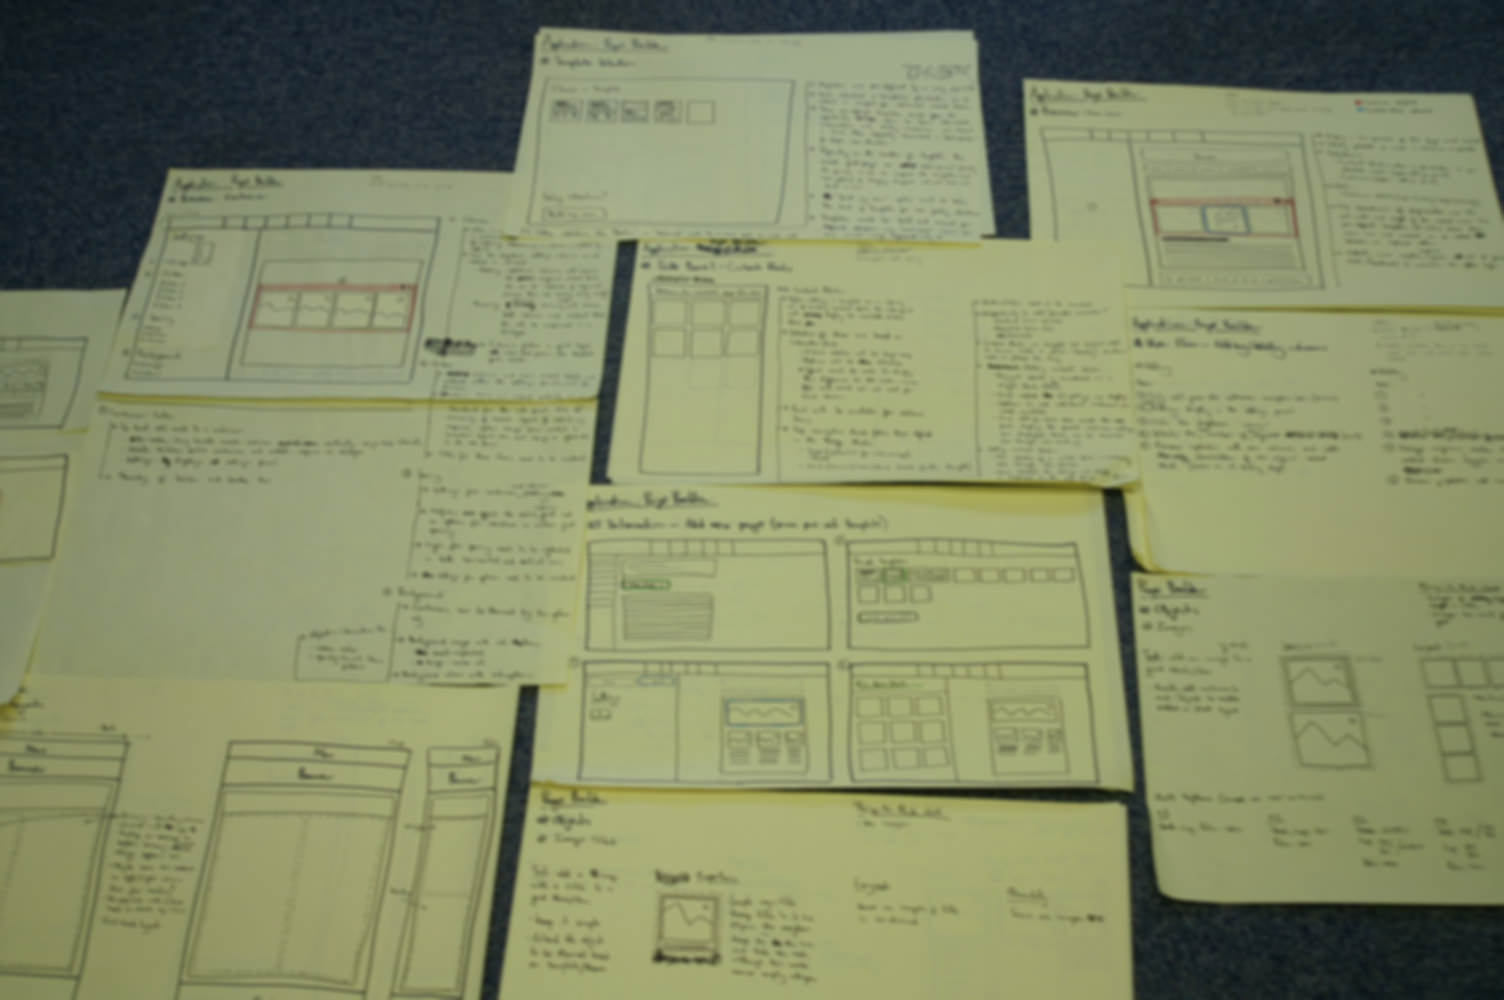
User Flows and Wireframes
Our User Experience designer kicked of this project by researching and creating a series of user-flows for each aspect of Pagebuilder -
- Dragging new content into the page
- Reordering, modifying and deleting said content
Once those user flows has been finalised, we turned to creating wireframes of the interface.
Drag and Drop
From the outset, we knew the biggest challenge on this project would be the drag and drop functionality. It needed to be as smooth and as glitch-free as possible for our users. With this in mind, we set about researching the best Javascript drag and drop library available to us (we didn’t have the time to write our own).
We looked at numerous libraries -
Our in-house ethos is to try and avoid using jQuery as much as possible, so we tried our hardest to find native Javascript drag and drop libraries. Unfortunately, we felt none of the libraries we found had a large enough community around them to warrant using them (though we did quite like Interact JS).
We felt that given our time constraints we needed a large community around the library in order to resolve any bugs or problems we might encounter, and also to future-proof the codebase for later developers. With that in mind, we did end up using the jQuery UI draggable, sortable and droppable libraries.
WYSIWYG Editor
With little time to write our own, we had to pick a WYSIWYG editor to use. We settled on Davi Ferreira’s clone of Medium.com’s text editor, given it’s relative simplicity, use of vanilla JavaScript and IE support. Our senior developer, Joel Day contributed a number of changes to the editor’s codebase to improve functionality, and has since been invited to become a collaborator on the Github project.
One other text editor we looked at using was the Guardian’s Scribe editor which is very well modularised and was ideal for us - however it lacked IE support and we didn’t have the time to add that ourselves.
Stage 2 - Prototyping
Once we had our user flows, wireframes and decided which drag and drop library to use - we began making some rough prototypes for the drag and drop functionality. The purpose of this was to gauge how long it would take us to implement drag and drop and identify any immediate bugs or problems with that functionality.
This went surprisingly well, with hardly any problems that we couldn’t iron out relatively quickly (with the help of Google and Stackoverflow). This then left us free to focus a lot more time on other functionality and the user interface later on in the project - as we were able to use much of the code (after a bit of a refactor) from the prototype in the main codebase.
Stage 3 - Development
The majority of Pagebuilder was built using vanilla Javascript and a small amount of PHP to handle saving, loading and publishing of the page. We also made use of Grunt to compile the various modularised Javascript files (using uglify) and SASS for compiling the components we are using from our pattern library.
For development, we broke Pagebuilder down into four parts -
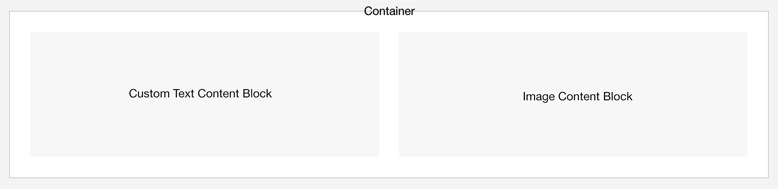
- Containers
- Content Blocks
- Dragging and Dropping of the containers and content blocks
- Panels for displaying/editing container and content block settings
In keeping with our ethos of avoiding using jQuery the only part of the Pagebuilder code that uses it is the drag and drop functionality, we made a point of ensuring everything else was vanilla Javascript.
We did this to decrease reliance on an external library for a key feature, and because we believe it’s better (although, not always) to call a native Javascript function than having to call a jQuery function, which often in turn calls a number of other jQuery functions to then run the native Javascript code.
As expected, our major problems were with the drag and drop functionality. There were some very strange bugs - one of the more notable ones, was when jQuery UI Droppable was sporadically firing the drop event on the onmouseover event - this resulted in content blocks being added in places they shouldn’t be.
To fix this, our solution was to move the code within the drop callback, and place it in the stop callback. In drop we are setting a variable (containing the drop event object) and clearing that variable on other events like out - and so on stop if that variable is set, we know it is supposed to actually drop - and so we run the drop functionality instead. This is a very hacky solution, and we are still unsure why the drop event was being fired at the wrong time.
We’re using jQuery UI Sortable to reorder the content blocks within a container, and jQuery UI Droppable to drop new content blocks into those sortable lists (this is just how jQuery UI works).
You can only have a maximum of 4 content blocks within a container, and as Sortable has no maximum items option our way around this was to count how many content blocks are within the container when you’re hovering over it (to drop a new content block in). If on hover the content block is full, we’re using CSS to hide the placeholder divs - otherwise if it isn’t full, we resize the content blocks within the container to fit around the placeholder. When the drop event is run, if that container is full we then we immediately delete the DOM elements added by jQuery UI Droppable (whilst also hiding it with CSS).
A few other minor irritations we came across were IE9s lack of support for classList and both IE9 and 10s lack of support for dataset. We implemented a polyfill for classList and tried a few dataset polyfills to no avail, so had to change all references to dataset to setAttribute("data-....") or getAttribute(...).
Stage 4 - User Testing
We left the user testing (on our internal customer support team) till last. In hindsight, we think this could be improved by including time to plan the user testing in our original planning stage, and doing the testing on a more iterative basis, with a minimal testable feature approach.
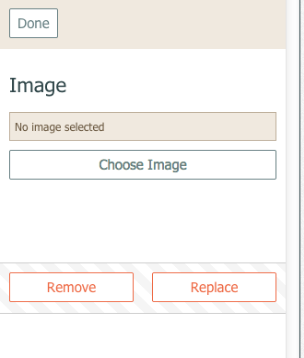
One of the most surprising aspects of the user testing for us, was the confusion between the “Done” and “Replace” buttons whilst editing a content block. We believe this was down to the wording and the location of the buttons.
To us, “Done” symbolised “I`m done making changes to this particular content block” - whilst “Replace” takes the user to a separate screen to “Replace this current text content block with another, such as an image”.
During our testing, users repeatedly clicked “Replace” thinking it would have the result of clicking “Done”.
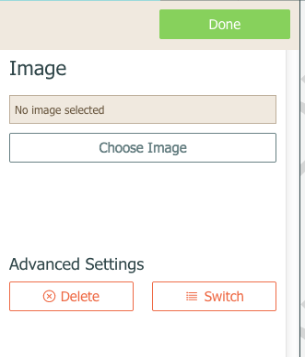
Our immediate solution to this was to reposition the “Done” button to the top right, and give it a fixed position so it would overlay the content if the user scrolled. We also changed the word “Replace” to “Switch” and enhanced the styling of the buttons. We will be gathering more feedback to determine if this is the best solution.
Before and after:
Wrapping Up
Pagebuilder is currently only available as a beta feature to our users, on a request basis so that we can gather feedback and ensure it’s bug free before launching it to our whole customer base.
Going forward our plan is to add and refine functionality based on our users feedback during the beta stage, and to integrate more of our other features into Pagebuilder so the user doesn’t have to navigate away from the page, for example to create forms.